Setting a Static IP Address on a LAN Network: A Comprehensive Guide
In today's interconnected world, having a stable and reliable network is crucial for smooth and efficient communication. A static IP address on a LAN network plays a vital role in ensuring consistent and predictable connectivity for devices connected to the network. In this article, we will delve into the importance of setting a static IP address on a LAN network and provide a step-by-step guide on how to do it.
Why Set a Static IP Address on a LAN Network?
A static IP address is a fixed network identifier assigned to a device, unlike a dynamic IP address assigned via DHCP, which changes over time. Setting a static IP address on a LAN network has several benefits, including:
- Consistent access to servers, web applications, and other networked devices
- Predicable and reliable connectivity for devices requiring stable network access
- Enhanced network security and stability
- Improved troubleshooting and diagnostics
Configuring a Static IP Address on a LAN Network
To configure a static IP address on a LAN network, you'll need to access your network settings and adjust your IP configuration. The process may vary depending on your operating system and network setup. Here's a general step-by-step guide:
- Open your network settings and navigate to the IP configuration section
- Switch from DHCP to static IP addressing
- Enter your desired IP address, subnet mask, gateway, and DNS server details
- Save your changes and reboot your device
Setting a Static IP Address on Windows 11
On Windows 11, you can set a static IP address by following these steps:
- Open Settings, then go to Network & Internet
- Find the Properties for your network and select it
- Change the IP settings from DHCP to Manual
- Enter your desired IP address, subnet mask, gateway, and DNS server details
- Save your changes and reboot your device
Setting a Static IP Address on Linux
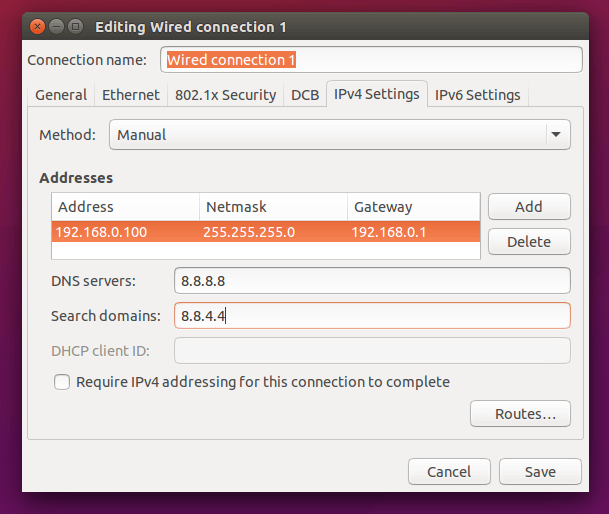
On Linux, you can set a static IP address by modifying the Ethernet configuration files. Here's a step-by-step guide:
- Open the Ethernet configuration file using a text editor
- Change the IP address, subnet mask, gateway, and DNS server details
- Save your changes and reboot your device
Configuring a Static IP Address on a Router
To configure a static IP address on a router, you'll need to access the router's settings and adjust the IP configuration. The process may vary depending on your router model and manufacturer. Here's a general step-by-step guide:
- Open the router's settings and navigate to the IP configuration section
- Click on the static IP address option and enter your desired IP address, subnet mask, gateway, and DNS server details
- Save your changes and reboot your device
Conclusion
Setting a static IP address on a LAN network is a crucial step in ensuring reliable and predictable connectivity for devices connected to the network. By following the step-by-step guide outlined in this article, you can configure a static IP address on your Windows or Linux device or router and enjoy enhanced network stability and security.
Additional Tips and Tricks
Here are some additional tips and tricks for setting a static IP address on a LAN network:
- Use a consistent IP address to simplify troubleshooting and diagnostics
- Use a static IP address for devices requiring constant network access, such as servers and networked printers
- Use a DHCP reservation to assign a static IP address to a specific device
- Configure your DNS server settings to ensure accurate DNS resolution


![[Wireless Router] How to manually assign LAN IP around the DHCP list ...](https://tech.securitydevices.pk/wp-content/uploads/2023/09/configure-static-ip-address-on-windows-server-2022-0.png "[Wireless Router] How to manually assign LAN IP around the DHCP list ...")


