Setting up a Twitch Audio Setup: Tips and Tricks for High-Quality Sound
When it comes to live streaming on Twitch, high-quality audio is just as important as high-quality video. A good audio setup can make all the difference in engaging your audience and enhancing their viewing experience. In this article, we'll take a deep dive into setting up a Twitch audio setup and provide you with tips and tricks to achieve professional-sounding audio.
Choosing the Right Audio Devices
The first step in setting up a Twitch audio setup is to choose the right audio devices. You'll need a good quality microphone that can capture clear and crisp audio. You can choose from a variety of microphones, including USB microphones, XLR microphones, and condenser microphones. Some popular options include the Rode NT1-A, the Blue Yeti, and the HyperX QuadCast Gaming Microphone.
In addition to a good quality microphone, you'll also need a way to connect it to your computer. This can be done using a USB port or an XLR cable. If you're using a USB microphone, you can connect it directly to your computer using a USB cable. If you're using an XLR microphone, you'll need to connect it to an XLR cable, which can then be connected to your computer or a sound card.
- USB Microphones: These are plug-and-play microphones that connect directly to your computer via USB. They're easy to use and don't require much setup.
- XLR Microphones: These microphones require a separate sound card or mixer to connect to your computer. They offer higher quality audio but require more setup and configuration.
Configuring Your Audio Settings
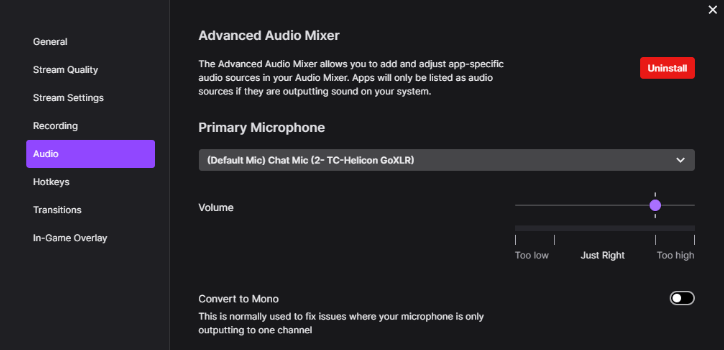
Once you've chosen your microphone and connected it to your computer, it's time to configure your audio settings. This involves adjusting the microphone gain, selecting the correct audio device, and ensuring that your audio settings are optimized for Twitch streaming.
- Microphone Gain: This sets the sensitivity of your microphone and can be adjusted to capture the best possible audio. You'll want to adjust the gain to ensure that your audio isn't too loud or too quiet.
- Audio Device: This specifies which audio device should be used for your Twitch stream. You'll need to select the microphone you're using and configure any additional audio settings.
- Audio Settings: This includes settings such as sample rate, bit rate, and encoding quality. These settings can be adjusted to optimize your audio quality for Twitch streaming.
Testing Your Audio Settings
Once you've configured your audio settings, it's essential to test your audio to ensure that it sounds good. You can do this by playing back a recording of your stream or by using a tool like Audacity to analyze your audio.
- Test Your Audio: Play back a recording of your stream to ensure that your audio sounds good and isn't distorted or too quiet.
- Use Audacity: This free audio editing software can be used to analyze your audio and provide you with feedback on your settings.
Advanced Audio Settings for Twitch Streamers
Once you've got your basic audio setup working, you can start experimenting with more advanced audio settings to enhance your Twitch stream. This can include adding effects, using multiple microphones, and configuring your audio for optimal sound quality.
- Effects: You can add effects to your audio using software like Audacity or Adobe Audition. This can include EQ, compression, and reverb effects.
- Multiple Microphones: You can use multiple microphones to record different audio sources, such as vocals and instruments.
- Optimal Sound Quality: You can configure your audio settings to optimize the sound quality for Twitch streaming, including adjusting the sample rate, bit rate, and encoding quality.
Common Audio Issues and Solutions
While setting up a Twitch audio setup can be straightforward, there are some common audio issues that you may encounter. Here are some common issues and their solutions:


